Prerequisites
Before following the examples, ensure you have:
- Docker installed (see Docker installation guide)
- Visual Studio Code with the Dev Containers and Container Tools extensions
- Git for cloning repositories
- A basic understanding of command-line interfaces
Jekyll Concepts
What is Ruby?
Ruby is a high-level, general-purpose programming language known for its simplicity and readable syntax. It’s beginner-friendly yet powerful enough for large-scale applications. Ruby powers the Ruby on Rails web framework and tools like Jekyll. To use Jekyll, you need Ruby installed to manage dependencies and run commands.
What is Jekyll?
Jekyll is a static site generator written in Ruby. Unlike traditional content management systems (e.g., WordPress) that rely on databases, Jekyll transforms plain text files (Markdown or HTML) into a static website. It’s ideal for blogs and documentation due to its simplicity, speed, and integration with GitHub Pages, which offers free hosting from a GitHub repository. Jekyll supports customizable layouts, themes, plugins, and configuration.
What is a Jekyll Theme?
A Jekyll theme is a pre-designed collection of templates, layouts, stylesheets, and assets (e.g., images, fonts) that defines a site’s appearance and structure. Themes enable quick setup of professional websites without designing from scratch. They include templates for pages like homepages, blog posts, and archives. Themes can be customized via the _config.yml file or by modifying their source files.
How to Use a Jekyll Theme?
You can apply a Jekyll theme in two ways:
- Remote Theme (GitHub Pages-compatible):
For GitHub Pages hosting, specify a theme published as a Ruby gem in your
_config.yml:theme: minimaJekyll automatically applies the theme during site builds.
- Local Theme: For local development or extensive customization, clone a theme’s files into your project directory to modify layouts, styles, and includes directly.
GitHub Pages
What is GitHub Pages?
GitHub Pages is a free hosting service provided by GitHub for publishing static websites directly from a GitHub repository. It’s particularly popular for hosting Jekyll sites, as it natively supports Jekyll’s static site generation. GitHub Pages allows you to create personal, project, or organization websites, making it an excellent choice for blogs, portfolios, or documentation.
How Does GitHub Pages Work with Jekyll?
GitHub Pages automatically builds and serves Jekyll sites when you push your repository to GitHub. You can use a supported theme (via _config.yml) or customize your site with local theme files. The generated static files are served from a specific branch (typically gh-pages or main) or a /docs folder in your repository.
Why Use GitHub Pages with Docker?
Using Docker for local Jekyll development ensures your environment matches GitHub Pages’ build process, avoiding dependency conflicts. You can test your site locally in a container, push changes to GitHub, and let GitHub Pages handle deployment. This workflow streamlines development and ensures consistency between local previews and the live site.
This blog uses Jekyll with a customized TeXt Theme, developed locally in a Docker container and deployed via GitHub Pages.
Creating a container with Docker
Dockerfile for Jekyll
FROM ubuntu:22.04

# Configure timezone (prevents interactive prompts)
ENV TZ="America/Monterrey"
RUN ln -snf /usr/share/zoneinfo/$TZ /etc/localtime && echo $TZ > /etc/timezone

# Install system dependencies and tools
RUN apt-get update && apt-get install -y \
    git \
    curl \
    autoconf \
    bison \
    build-essential \
    libssl-dev \
    libyaml-dev \
    libreadline6-dev \
    zlib1g-dev \
    libncurses5-dev \
    libffi-dev \
    libgdbm6 \
    libgdbm-dev \
    libdb-dev \
    apt-utils \
    sudo \
    tzdata \
    && apt-get clean \
    && rm -rf /var/lib/apt/lists/*

# Configure user
ARG USERNAME=remoteUser
ARG USER_UID=1000
ARG USER_GID=$USER_UID

RUN groupadd --gid $USER_GID $USERNAME \
    && useradd --uid $USER_UID --gid $USER_GID -m $USERNAME \
    && echo $USERNAME ALL=\(root\) NOPASSWD:ALL > /etc/sudoers.d/$USERNAME \
    && chmod 0440 /etc/sudoers.d/$USERNAME

USER $USERNAME
WORKDIR /home/$USERNAME

# Configure Ruby with rbenv
ENV RBENV_ROOT="/home/$USERNAME/.rbenv"
ENV RUBY_VERSION="3.4.4"
ENV PATH="${RBENV_ROOT}/bin:${RBENV_ROOT}/shims:$PATH"

# Install rbenv and ruby-build
RUN git clone https://github.com/rbenv/rbenv.git ${RBENV_ROOT} \
    && git clone https://github.com/rbenv/ruby-build.git ${RBENV_ROOT}/plugins/ruby-build

# Configure bash to load rbenv and persistent history
RUN echo 'export PATH="$HOME/.rbenv/bin:$PATH"' >> ~/.bashrc \
    && echo 'eval "$(rbenv init -)"' >> ~/.bashrc \
    && echo 'export HISTFILE=/home/remoteUser/.bash_history_volume/.bash_history' >> ~/.bashrc \
    && echo 'export HISTSIZE=10000' >> ~/.bashrc \
    && echo 'export HISTFILESIZE=10000' >> ~/.bashrc

# Install Ruby
RUN rbenv install ${RUBY_VERSION} \
    && rbenv global ${RUBY_VERSION} \
    && rbenv rehash

# Install Jekyll and Bundler
RUN gem install bundler jekyll \
    && rbenv rehash

# Create directories for mounted volumes and Bundler gems
RUN mkdir -p /home/$USERNAME/.bash_history_volume \
    && mkdir -p /home/$USERNAME/.bashrc.d \
    && mkdir -p /home/$USERNAME/.rbenv/gems \
    && chown -R $USERNAME:$USERNAME /home/$USERNAME/.rbenv/gems

# Set up workspace directory for projects
WORKDIR /workspace

# Expose Jekyll's default port
EXPOSE 4000

# Default command
CMD ["bash"]
Building and Running the Container
- Build the Docker image:
docker build -t jekyll-site . - Run the container (mount your project directory to
/workspace):docker run -it -p 4000:4000 -v $(pwd):/workspace jekyll-site - Run the
run-once.shscript to set up the Jekyll environment:./run-once.shNote: Ensure
run-once.shexists in your project this site has the following script.#!/bin/bash # Display current Ruby version echo "Ruby version" ruby -v # Display current Jekyll version echo "Jekyll version" jekyll -v # Update gems echo "bundle install" bundle install echo "bundle update" bundle update - Start the Jekyll development server with live reload:
bundle exec jekyll serve --host 0.0.0.0 --port 4000 --baseurl "/risingembeddedmx" --livereload
Using docker compose
Docker Compose is a tool for defining and managing multi-container Docker applications using a YAML file. It allows you to configure services, networks, and volumes in a single file, then start and stop the entire application with simple commands. Each service typically represents a container, and Docker Compose simplifies tasks like running multiple containers (e.g., a web app and a database) with predefined settings, ensuring consistent environments.
Yaml file
Another way to build and access the container for this site is by using the Docker Compose tool. A YAML file was created:
services:
  jekyll:
    build: .
    container_name: jekyll-site
    ports:
      - "4000:4000"
    volumes:
      # Bind mount the current directory to /workspace in the container
      # and use named volumes for persistent data
      # for rbenv, bash history, and bash configuration
      # This allows you to keep your Jekyll site files and configurations
      - .:/workspace
      - jekyll-rbenv:/home/remoteUser/.rbenv
      - jekyll-history:/home/remoteUser/.bash_history_volume
      - jekyll-bash-config:/home/remoteUser/.bashrc.d
    environment:
      - TZ=America/Monterrey
      - BUNDLE_PATH=/home/remoteUser/.rbenv/gems
    stdin_open: true
    tty: true
    working_dir: /workspace
    command: /bin/bash

volumes:
  jekyll-rbenv:
    driver: local
  jekyll-history:
    driver: local
  jekyll-bash-config:
    driver: local
With these configs, the process to use the site is as follows:
- The first time, build the container:
docker-compose up --build -d - Start the container:
docker-compose up -d - Execute a bash inside the container:
docker-compose exec jekyll bash - The first time in the container, run the initial script.
./run-once.sh - Compile the site with the following line:
bundle exec jekyll serve --host 0.0.0.0 --port 4000 --baseurl "/risingembeddedmx" --livereload -
The site is available on: http://127.0.0.1:4000/risingembeddedmx/notes/en/docker-jekyll-en.
-
When your changes are ready, press Ctrl+C to stop the process.
- Exit the container by typing:
exit - Turn off the container:
docker-compose down
Using Jekyll with VS Code
This blog uses Docker to compile the Jekyll site locally and preview content before publishing. To integrate with VS Code, install these extensions:
In Visual Studio Code, you can use the container directly from the graphical interface. Once the extensions are installed and the Dockerfile is ready, follow these steps to run your environment inside a container: Follow these steps to develop in a containerized environment:
-
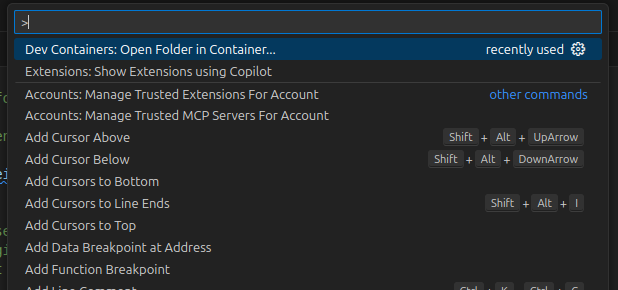
Open VS Code and press Ctrl+Shift+P to access the command palette.
-
Select Dev Containers: Open Folder in Container.
-
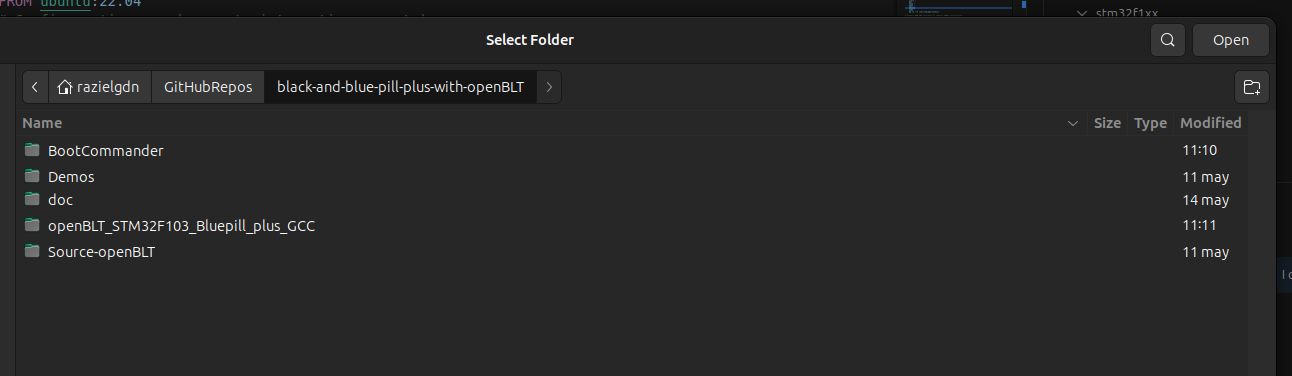
Choose your project folder and click Open.
-
When prompted, select Add configuration to user data folder.
-
Choose From Dockerfile as the configuration source.
-
Accept default settings in subsequent prompts.
-
Wait for the container to build and initialize.
- Run the
run-once.shscript to set up the Jekyll environment:./run-once.sh - Start the Jekyll development server with live reload:
bundle exec jekyll serve --livereload - (optional) Build the site for production:
JEKYLL_ENV=production bundle exec jekyll build - Access the site at
http://localhost:4000(adjust the path if your site uses a base URL, e.g.,http://localhost:4000/risingembeddedmx).
Container to compile STM32 Projects
This section shows a Dockerfile for compiling STM32 microcontroller projects, based on the openblt to Bluepill board project
Dockerfile for STM32
# Description: Dockerfile for a development environment for STM32 applications.
FROM ubuntu:22.04
# Configure timezone (prevents interactive prompts)
ENV TZ="America/Monterrey"
RUN ln -snf /usr/share/zoneinfo/$TZ /etc/localtime && echo $TZ > /etc/timezone

# Install dependencies
# This section installs essential packages for building and debugging STM32 applications.
#It includes make, cmake, git, gcc, g++ and other necessary tools.
# It also cleans up the apt cache to reduce image size.
RUN apt-get update && \
    apt-get install -y --no-install-recommends \
    build-essential \
    cmake \
    git \
    make \
    wget \
    tzdata \
    sudo \
    && rm -rf /var/lib/apt/lists/*

# Install ARM GNU Toolchain to compile STM32 applications
# Note: This is a specific version; you may want to update it as needed.
# The toolchain is downloaded from the official ARM Keil website.
RUN mkdir -p /opt && \
    wget --no-check-certificate https://armkeil.blob.core.windows.net/developer/Files/downloads/gnu/14.2.rel1/binrel/arm-gnu-toolchain-14.2.rel1-x86_64-arm-none-eabi.tar.xz -O /opt/arm-gnu-toolchain.tar.xz && \
    tar -xf /opt/arm-gnu-toolchain.tar.xz -C /opt && \
    rm /opt/arm-gnu-toolchain.tar.xz

# Configure user
# This section creates a non-root user with sudo privileges.
# It is recommended to run containers as non-root users for security reasons.
# You can change the USERNAME, USER_UID, and USER_GID as needed.
ARG USERNAME=remoteUser
ARG USER_UID=1000
ARG USER_GID=$USER_UID

RUN groupadd --gid $USER_GID $USERNAME \
    && useradd --uid $USER_UID --gid $USER_GID -m $USERNAME \
    && echo $USERNAME ALL=\(root\) NOPASSWD:ALL > /etc/sudoers.d/$USERNAME \
    && chmod 0440 /etc/sudoers.d/$USERNAME

USER $USERNAME
WORKDIR /workspace

# Default command
CMD ["/bin/bash"]
Building and Running the Container
- Build the Docker image:
docker build -t stm32-dev . - Run the container:
docker run -it -v $(pwd):/workspace stm32-dev
Using the STM32 Container with VS Code
- Open VS Code and press Ctrl+Shift+P.
- Select Dev Containers: Open Folder in Container.
- Choose your project folder (e.g., the OpenBLT repository).
- Select Add configuration to user data folder.
- Choose From Dockerfile.
- Accept default settings.
- Wait to the container is ready.
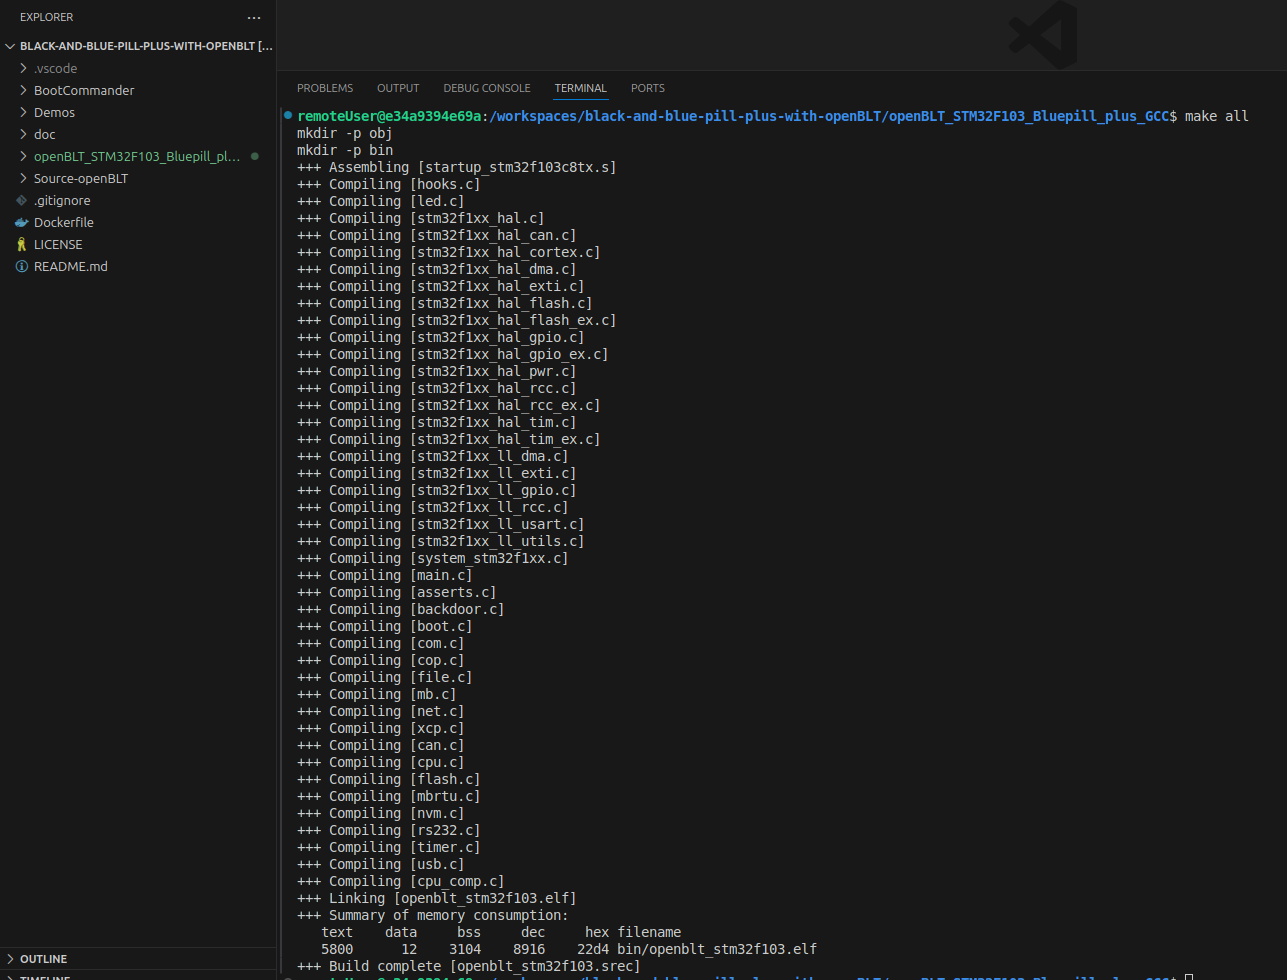
- Open a terminal and navigate to the project directory:
cd openBLT_STM32F103_Bluepill_plus_GCC/ make clean all - The compilation output will generate the necessary binaries for the STM32 project.
Example output
Troubleshooting Tips
- Port Conflicts: If port 4000 is in use, change the port mapping (e.g.,
-p 4001:4000) and access the site athttp://localhost:4001. - Permission Issues: Ensure your user has access to the Docker daemon (
sudo usermod -aG docker $USER). - Missing
run-once.sh: Create the script if it’s not included in your repository. - Toolchain Errors: Verify the ARM toolchain URL is valid, as versions may change.
Conclusion
Using Docker for Jekyll and STM32 projects ensures consistent, isolated development environments. GitHub Pages simplifies deployment of Jekyll sites, while Docker ensures local development matches the production environment. The STM32 container streamlines embedded programming. By integrating with VS Code’s Dev Containers, you can enhance your workflow with minimal setup.