This is a very advanced topic for embedded systems, but due to stock market reasons and business strategy decisions at the company I worked for, I’m currently on an indefinite vacation.
Since developers tend to think in binary terms, I had two choices: either sit around regretting things and asking myself “why me?”, or take the opportunity to sharpen my skills while looking for a new job.
Yocto Project
“Yocto” is the SI prefix for one of the smallest measurement scales (until 2022 when even smaller prefixes were added), meaning a multiplier of 10^-24 — that is, 0.000…1 with 24 zeros before the 1.
In our context, it means something very small. The Yocto Project is a set of tools used to create fully customized Linux-based operating systems, allowing you to manipulate each component in the build process.
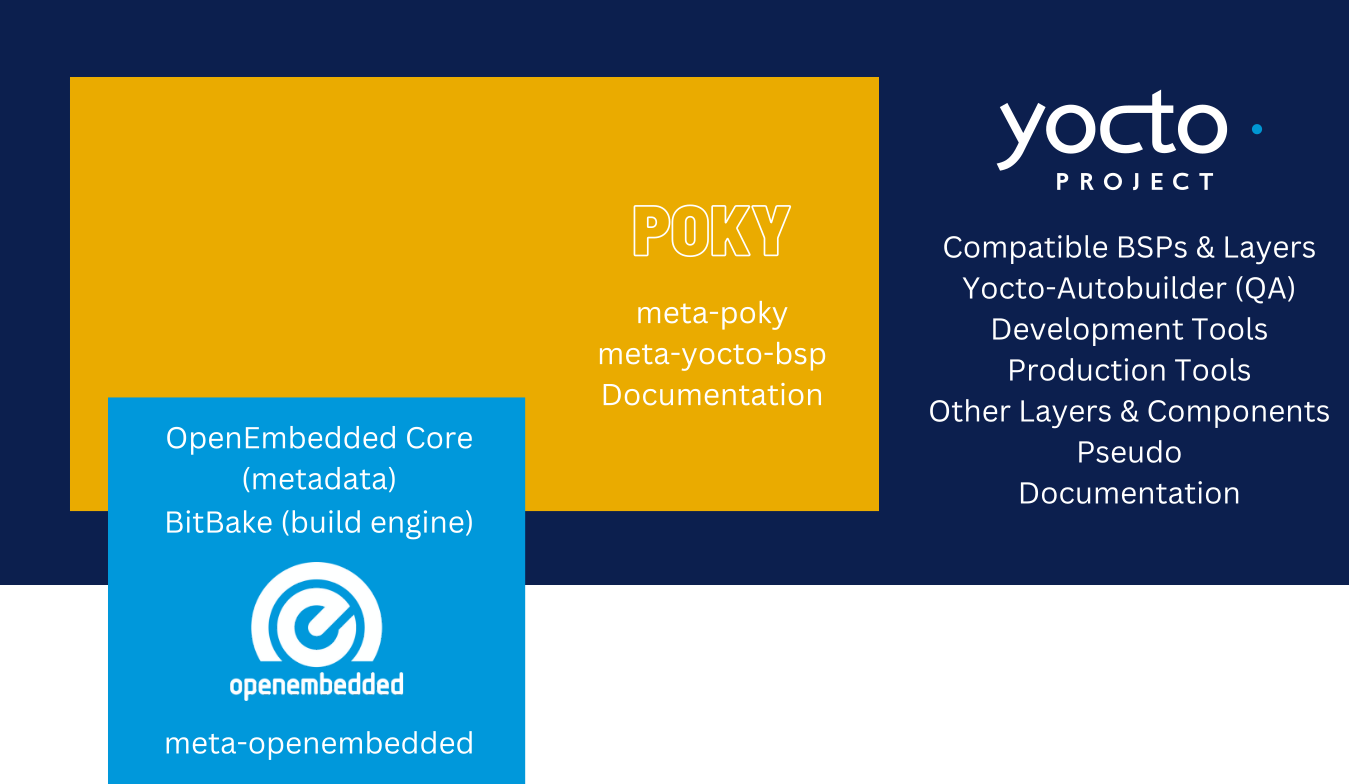
The Yocto Project combines and maintains several key elements:
- The OpenEmbedded build system, made up of OpenEmbedded Core and BitBake.
- A Linux embedded configuration used for testing (called Poky).
- A broad testing infrastructure via an automated builder based on Buildbot.
-
Tools for efficiently working with embedded Linux:
- Automation tools for building and testing.
- Processes and standards for board-level support definitions and sharing.
- Tools for security analysis, license compliance, and SPDX-based Software Bill of Materials (SBoM) support.
There are many open source components under the Yocto Project umbrella.
Poky, the reference embedded OS, is a build example that compiles a small operating system using BitBake (the build engine), OpenEmbedded-Core, and Poky’s metadata.
The build system downloads Poky’s build instructions called “recipes” and “layers”. You can modify, copy, or reuse Poky’s specifications to create your own customized Embedded Linux system.
Building a Custom Operating System
The official documentation explains why Yocto is an excellent choice for creating embedded system products:
- Widely adopted in the industry; many chipmakers, OS vendors, and service providers support Yocto.
- Compatible with multiple architectures (Intel, AMD, MIPS, ARM, and more).
- Supports a wide range of emulated devices through QEMU.
- Easy to port images and code without changing development environments.
- Highly flexible — a company can create a custom distribution and several tailored products from it.
- Great for IoT devices, allowing inclusion of only necessary components.
- Supports third-party toolchains and common architectures.
- Uses a layered model, letting you add packages incrementally, reducing redundancy.
- Supports partial builds, allowing you to build/rebuild individual packages.
- Offers precise dependency control, ensuring high binary reproducibility.
- Backed by an active community, helpful forums, and a strong ecosystem.
- Provides license manifests to help track open-source license usage.
Challenges in Using Yocto
Despite its power, Yocto comes with some challenges:
- Steep learning curve; many ways to accomplish the same task.
- Understanding changes needed for a new design requires research.
- Workflow can confuse desktop/server users used to precompiled packages; here, everything must be configured and rebuilt.
- Cross-building environments can be unfamiliar; testing code directly on the target board may feel faster than building and transferring it.
- OpenEmbedded creates packages in standard formats (rpm, deb, ipk) — you can install these on a running system.
- Initial build times are long due to compiling everything from scratch. But Yocto caches results for future builds.
Things I Wish I’d Known
The official docs have a “What I Wish I’d Known” section — here’s a summary:
Using Yocto is easy — until something breaks. Without understanding how the build process works, it can feel like a black box. Here are things to know before diving in:
- Use Git instead of tarballs to ensure updates and bug fixes.
- Know the Layer Index. All official layers are listed there, including those marked as Yocto-compatible.
- Use BSP layers from vendors (Intel, NXP, Raspberry Pi, etc.) as a base; don’t reinvent the wheel.
- Avoid putting everything in one layer. Use logical separation (BSP, GUI, distro config, apps, etc.) for maintainability.
- Never ever modify the Poky layer — changes will be lost in the next release.
-
Use the All-in-One Mega Manual instead of outdated Google results.
- Learn the build process stages:
- Fetch – download source code.
- Extract – unpack it.
- Patch – apply fixes and features.
- Configure – set environment params.
- Build – compile and link.
- Install – place files in expected locations.
- Package – prepare files for deployment. Each step helps debug issues when something goes wrong.
 w
w - You can generate dependency graphs (
-goption) to troubleshoot build problems. - Understand the “magic” folder names in
tmp/work. Use-uto get UI feedback in graphical or text mode. - You can build more than just images — individual recipes or packages too. Use the dev shell.
- Clarify the difference: Recipes contain build instructions; Packages are the output.
- Know what’s included in your root filesystem.
- Learn to write custom recipes.
- An embedded developer using Yocto should be able to:
- Navigate corporate proxies.
- Add packages to an image.
- Distinguish recipes from packages.
- Build a package and understand why.
- Identify which files/packages belong to what.
- Add SSH support to images.
- Understand recipe anatomy.
- Create and manage layers.
- Find recipes in OpenEmbedded.
- Know the difference between machine and distro configurations.
- Use BSPs for your hardware.
- Configure distro features.
- Run and troubleshoot tasks individually.
- Use devtools to simplify work.
- Speed up builds using shared downloads and caches.
- Generate and read dependency graphs.
- Understand the BitBake environment.
- Build SDK extensions.
- Depending on your interests, you may want to:
- Read the Yocto Development Tasks Manual.
- Explore the Application Development Manual and eSDK.
- Learn Kernel Development via its dedicated manual.
- Learn about Board Support Packages (BSPs).
- Use Toaster, a web interface for the Yocto build system.
- Explore VS Code or Eclipse plugins.
- Keep the Yocto Project Reference Manual handy.