It is said that the best way to learn to program is by programming, and the same principle holds true for operating systems. Therefore, in these chapters, we will be working with a new Embedded Linux image for Raspberry Pi 4. The documentation I am following corresponds to version 4.0.16 (kirkstone), which I chose arbitrarily.
The first step is to configure our operating system as a host to compile and work with Yocto Project.
To begin, we must work in Linux, either on a virtual machine or on a PC with a Linux distribution installed “natively.” I strongly discourage using a virtual machine, as we will need to push the processor and RAM to the limits of our machines.
The Yocto Project documentation recommends using a tested distribution, so according to the list available as of this writing (March 2024), it should be one of the following:
- Ubuntu 20.04 (LTS)
- Ubuntu 22.04 (LTS)
- Fedora 38
- Debian GNU/Linux 11.x (Bullseye)
- AlmaLinux 8
In my case, I used Ubuntu 22.04, although I also used Fedora 39, and it worked. First, we must update our system and install various software packages and tools to enable us to work. So, in our terminal, we execute the installation with the following command:
sudo apt install gawk wget git diffstat unzip texinfo gcc build-essential chrpath socat cpio python3 python3-pip python3-pexpect xz-utils debianutils iputils-ping python3-git python3-jinja2 libegl1-mesa libsdl1.2-dev python3-subunit mesa-common-dev zstd liblz4-tool file locales libacl1
For this tutorial, as it might be called, we will start by compiling a minimal system for Raspberry Pi, following the steps in the manual and adapting them to our purposes:
- Create a directory where we will store the resources we’ll work with. In my case, I chose to have a directory for Yocto and, within it, one for the project.
$ mkdir ~/yocto $ cd ~/yocto $ mkdir poky-kirkstone $ cd poky-kirkstone - We proceed to clone Yocto Project. As mentioned earlier, we will use the kirkstone version. So, using Git:
$ git clone -b kirkstone git://git.yoctoproject.org/pokyThis command downloads the metadata and tools to use the poky distribution. Wait for it to complete.
- Now we download the Raspberry Pi layer in its kirkstone version.
$ git clone -b kirkstone git://git.yoctoproject.org/meta-raspberrypi - The OpenEmbedded tools, which are found in their own layer.
$ git clone -b kirkstone git://git.openembedded.org/meta-openembedded - To perform an initial compilation, we can set up the working environment, which downloads the tools and necessary components to build with Yocto Project.
source oe-init-build-env <build>- oe-init-build-env is a script that initializes the working environment.
- **
** is the name of the folder where all elements—source code, packages, makefiles, libraries, etc.—and the created image will be stored. For this tutorial: $ source oe-init-build-env build-RPI
- Now comes the part where we get our hands a bit dirty: adding the Raspberry Pi layer and configuring the compilation parameters.
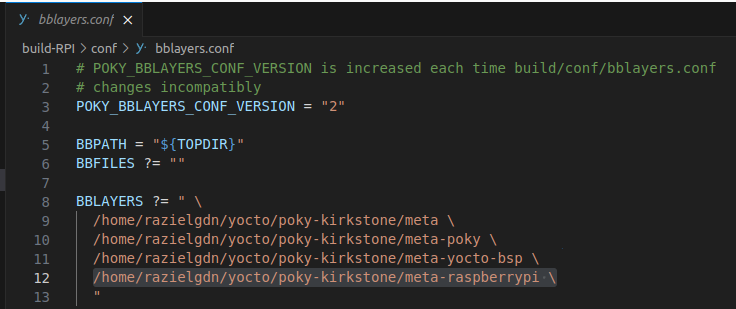
- Add the Raspberry Pi layer. Open the file conf/bblayers.conf and add the line: /home/razielgdn/yocto/poky-kirkstone/meta-raspberrypi \
- Configure the parameters in conf/local.conf. Find the architecture (machine) the image will run on and update it to: “raspberrypi4-64”.

- At the end of the file, you can add the number of threads to use and the number of tasks that can be compiled in parallel.
  BB_NUMBER_THREADS ?= "8"
  PARALLEL_MAKE ?= "-j 8"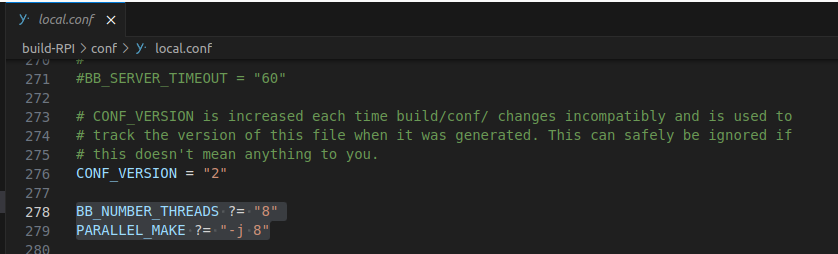
- Add the Raspberry Pi layer. Open the file conf/bblayers.conf and add the line: /home/razielgdn/yocto/poky-kirkstone/meta-raspberrypi \
- In my case, I prefer to download the packages first and then start the compilation. To perform the fetch tasks, run the following command:
$ bitbake --runall fetch core-image-minimal - To finalize, we proceed with the compilation. For a first example:
$ bitbake core-image-minimal - Now we wait for the system to complete the compilation, which will take as long as necessary.
- Flash the software onto an SD card to run it on our Raspberry Pi.
- The image is located at ~/yocto/poky-kirkstone/build-RPI/tmp/deploy/images/raspberrypi4-64.
- You can use any flasher like balenaEtcher or the dd command:
sudo dd if=risingembeddedmx-image-raspberrypi4-64.rpi-sdimg of=/dev/sdc status=progress bs=1M